ASTM D6378
Standard Test Method for Determination of Vapor Pressure (VPx) of Petroleum Products, Hydrocarbons and Hydrocarbon-Oxygenate Mixtures (Triple Expansion Method)1.
This test method covers the use of automated vapor pressure instruments to determine the vapor pressure exerted in vacuum by volatile, liquid petroleum products, hydrocarbons, and hydrocarbon-oxygenate mixtures. This test method is suitable for testing samples with boiling points above 0 °C (32 °F) that exert a vapor pressure between 7 kPa and 150 kPa (1.0 psi and 21 psi) at 37.8 °C (100 °F) at a vapor-to-liquid ratio of 4:1. The liquid sample volume size required for analysis is dependent upon the vapor-to-liquid ratio chosen (see Note 1) and the measuring chamber volume capacity of the instrument (Note 3).
NOTE 1—The test method is suitable for the determination of the vapor pressure of volatile, liquid petroleum products at temperatures from 0 °C to 100 °C at V/L ratios of 4:1 to 1:1 and pressures up to 500 kPa (70 psi), but the precision statement may not be applicable.
This test method also covers the use of automated vapor pressure instruments to determine the vapor pressure exerted in vacuum by aviation turbine fuels. This test method is suitable for testing aviation turbine fuel samples with boiling points above 0 °C (32 °F) that exert a vapor pressure between 0 kPa and 110 kPa (0 psi and 15.5 psi) at a V/L ratio of 4:1, in the temperature range from 25 °C to 100 °C (77 °F to 212 °F).
The vapor pressure (VPx) determined by this test method at a V/L ratio of 4:1 of gasoline and gasoline-oxygenate blends at 37.8 °C can be correlated to the dry vapor pressure equivalent (DVPE) value determined by Test Method D5191. This condition does not apply when the sample is aviation turbine fuel.
The values stated in SI units are to be regarded as the standard. The values given in parentheses are for information purposes only.
“ The determination of the Vapor Pressure (VPx) is essential to maximize the economics of gasoline blending operations, fast and reliably. The Triple Expansion Method is a high precision, very simple way to optimize the process of optimizing composition and to be as close as possible to product specification without the quality and volumes giveaways.
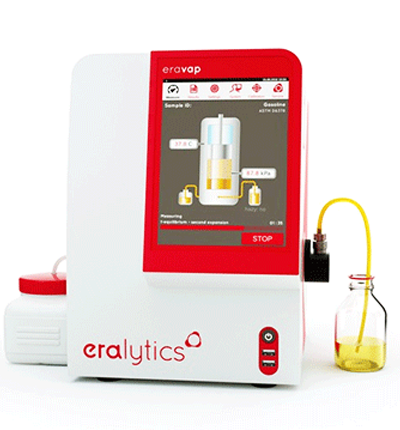
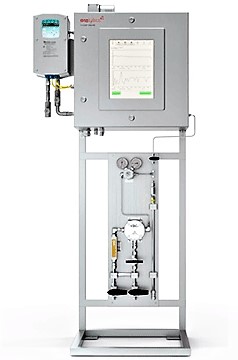
D6378 determines the absolute vapor pressure of hydrocarbons by determining the dissolved gas (air) in the liquids. No sample conditioning air saturation or cooling is necessary. Eralytics product line, Eravap and Eravap online strictly adheres to D6378 method and perfectly correlates to D5191 ”.
Referenced Documents
ASTM Standards:
D323 Test Method for Vapor Pressure of Petroleum Products (Reid Method)
D2892 Test Method for Distillation of Crude Petroleum (15-Theoretical Plate Column)
D4057 Practice for Manual Sampling of Petroleum and Petroleum Products
D4177 Practice for Automatic Sampling of Petroleum and Petroleum Products
D4953 Test Method for Vapor Pressure of Gasoline and Gasoline-Oxygenate Blends (Dry Method)
D5191 Test Method for Vapor Pressure of Petroleum Products (Mini Method)
D5842 Practice for Sampling and Handling of Fuels for Volatility Measurement
D5854 Practice for Mixing and Handling of Liquid Samples of Petroleum and Petroleum Products
D6299 Practice for Applying Statistical Quality Assurance and Control Charting Techniques to Evaluate Analytical Measurement System Performance
D6300 Practice for Determination of Precision and Bias Data for Use in Test Methods for Petroleum Products and Lubricants
D6708 Practice for Statistical Assessment and Improvement of Expected Agreement Between Two Test Methods that Purport to Measure the Same Property of a Material
_______________
1 This test method is under the jurisdiction of ASTM Committee D02 on Petroleum Products and Lubricants and is the direct responsibility of Subcommittee D02.08 on Volatility.
Terminology
Definitions:
dry vapor pressure equivalent (DVPE)—a value calculated by a correlation equation from the total pressure (Test Method D5191), which is equivalent to the value obtained on the sample by Test Method D4953, Procedure A.
partial pressure from dissolved air (PPA), n—the pressure exerted in vacuum from dissolved air that escapes from the liquid phase into the vapor phase.
Reid vapor pressure equivalent (RVPE)—a value calculated by a correlation equation from the TPX, which is equivalent to the value obtained on the sample by Test Method D323.
total pressure (TPx), n—the pressure exerted in vacuum by air- and gas-containing petroleum products, components and feedstocks, and other liquids, in the absence of undissolved water at a vapor-liquid ratio of X:1.
vapor pressure (VPx), n—the total pressure minus the PPA in the liquid at a vapor-liquid ratio of X:1.
Summary of Test Method
Employing a measuring chamber with a built-in piston, a sample of known volume is drawn into the temperature-controlled chamber at 20 °C or higher. After sealing the chamber, the temperature of the chamber is increased to a specified value simultaneously with the first expansion. Two further expansions are performed to a final volume of (X+1) times that of the test specimen. After each expansion, the TPX is determined. The PPA and the solubility of air in the specimen are calculated from the three resulting pressures. The (VPx) is calculated by subtracting the PPA in the liquid from TPx.
NOTE 2—For liquids containing very low levels of high vapor pressure contaminants, which behave like a gas, this test method of determination of the PPA and gases may lead to wrong results since the partial pressure of the contaminants will be included in the PPA. This effect is shown when the value of the PPA and gases exceeds the average maximum limit of 7 kPa (1 psi).
Significance and Use
Vapor pressure is a very important physical property of volatile liquids for shipping and storage.
The vapor pressure of gasoline and gasoline-oxygenate blends is regulated by various government agencies.
Specifications for volatile petroleum products generally include vapor pressure limits to ensure products of suitable volatility performance.
In this test method, an air saturation procedure prior to the measurement is not required, thus eliminating losses of high volatile compounds during this step. This test method is faster and minimizes potential errors from improper air saturation. This test method permits VPX determinations in the field.
This test method can be applied in online applications in which an air saturation procedure prior to the measurement cannot be performed.
Apparatus
The apparatus suitable for this test method employs a small volume, cylindrically shaped measuring chamber with associated equipment to control the chamber temperature within the range from 0 °C to 100 °C. The measuring chamber shall contain a movable piston with a maximum dead volume of less than 1 % of the total volume at the lowest position to allow sample introduction into the measuring chamber and expansion to the desired vapor-liquid ratio. A static pressure transducer shall be incorporated in the piston. The measuring chamber shall contain an inlet/outlet valve combination for sample introduction and expulsion. The piston and the valve combination shall be at the same temperature as the measuring chamber to avoid any condensation or excessive evaporation.
The measuring chamber shall be designed to contain between 5 mL and 15 mL of liquid and vapor and be capable of maintaining a vapor-liquid ratio of 4:1 to 1:1. The accuracy of the adjusted vapor-liquid ratio shall be within 0.05.
NOTE 3—The measuring chamber employed by the instruments used in generating the precision and bias statements were constructed of nickel plated aluminum and stainless steel with a total volume of 5 mL.
Measuring chambers exceeding a 5 mL capacity can be used, but the precision and bias statements are not known to apply.
The pressure transducer shall have a minimum operational range from 0 kPa to 200 kPa (0 psi to 29 psi) with a minimum resolution of 0.1 kPa (0.01 psi) and a minimum accuracy of 60.2 kPa (60.03 psi). The pressure measurement system shall include associated electronics and readout devices to display the resulting pressure reading.
Electronic temperature control shall be used to maintain the measuring chamber at the prescribed temperature within 60.1 °C for the duration of the vapor pressure measurement.
A platinum resistance thermometer shall be used for measuring the temperature of the measuring chamber. The minimum temperature range of the measuring device shall be from 0 °C to 100 °C with a resolution of 0.1 °C and an accuracy of 60.1 °C.
The vapor pressure apparatus shall have provisions for rinsing the measuring chamber with a solvent of low vapor pressure or with the next sample to be tested.
Vacuum Pump for Calibration, capable of reducing the pressure in the measuring chamber to less than 0.01 kPa (0.001 psi) absolute.
McLeod Vacuum Gauge or Calibrated Electronic Vacuum Measuring Device for Calibration, to cover at least the range from 0.01 kPa to 0.67 kPa (0.1 mm to 5 mm Hg). The calibration of the electronic vacuum measuring device shall be regularly verified in accordance with Annex A6.3 on Vacuum Sensors in Test Method D2892.
Pressure Measuring Device for Calibration, capable of measuring local station pressure with an accuracy and a resolution of 0.1 kPa (1 mm Hg), or better, at the same elevation relative to sea level as the apparatus in the laboratory.
NOTE 4—This test method does not give full details of instruments suitable for carrying out this test. Details on the installation, operation, and maintenance of each instrument may be found in the manufacturer’s manual.
Verification of Performance
After calibration, verify the instrument performance as an independent check against the instrument calibration each day the instrument is in use. For pure compounds (see 7.1) and blends that are prepared from pure compounds, multiple test specimens may be taken from the same container over time, provided spent test specimens are not reused, in whole or in part. Table 1 provides the accepted reference value (ARV) and uncertainty limits (at least 95 % confidence interval) of reference fluids tested in the 2003 ILS (see 16.1), which is based on the vapor pressure (VP4 (37.8 °C)) value measured. This information, combined with the tolerance value recommended by instrument manufacturers, was used to establish the acceptable testing range for the reference fuels to verify instrument performance.
Quality Assurance and Quality Control
After preparing and calibrating the apparatus according to manufacturer’s instructions and having verified that the instrument is performing properly, use a representative quality control (QC) sample to confirm that the instrument’s performance is in statistical control. Record the VP4 (37.8 °C) value and compare this to the decision criteria for statistical control. If the result is found to be outside the decision criteria for statistical control, initiate an investigation for root causes.
Store the QC sample in an environment suitable for long term storage without sample degradation. See Appendix X4(D6378) for guidelines and suggestions for preparing, storing, and isolating QC samples for use in the test.
Experimental values and QC/QA control samples should fall within the precision estimates of the method or comply with the general equations for “r” and “R” as described above. It is recommended to follow Standard Practice D6299 to help ensure the quality of data generated by this test method.
Test Procedure
Set the sample introduction temperature of the measuring chamber between 20 °C and 37.8 °C.
Set the vapor-liquid ratio to the desired value X:1 (for test results related to Test Method D5191, set the vapor-liquid ratio to 4:1).
Connect an aliquot of sample either in a syringe, pressurized sample container, or tubing immersed in the sample to the inlet of the apparatus. Make provisions to avoid loss of high volatiles in the sample. The overall volume of the sample shall exceed the volume of three rinsing cycles plus the final test volume. Follow the manufacturer’s instructions for introducing the test specimen into the measuring chamber.
Perform the three rinsing cycles immediately after connecting the sample.
Introduce the test specimen into the measuring chamber by a stroke of the piston. The volume of the specimen shall be such that after the expansion to the final volume the programmed vapor-liquid ratio is achieved.
Close the inlet valve and make the first expansion by a stroke of the piston.
Allow the temperature of the measuring chamber to increase to within 0.1°C of the desired test temperature.
Monitor the TPX at least once per second for at least 1 min. When all readings taken within 20 s agree within 0.3 kPa, record this resulting total pressure as TPX,1.
Make the second expansion, and monitor the TPX at least once per second for at least 1 min. When all readings taken within 20 s agree within 0.3 kPa, record this resulting total pressure as TPX,2.
Repeat 13.8 for the third expansion, and record the resulting total pressures as TPX,3.
Check for Sample Separation—After introducing the test specimen into the instrument for analysis, check the remaining sample for sample separation. This condition does not apply when the sample is aviation turbine fuel.
Report
Report the results to the nearest 0.1 kPa (0.02 psi), along with the volume container size (250 mL or 1 L for gasoline and gasoline-oxygenate blends; for aviation turbine fuel, 100 mL) in which the result was obtained, and specify the test temperature and vapor-liquid ratio.
If a haze was observed, state on the report document that the test sample was hazy simply by adding a “H” to the result ( xx.xH ) or the statement “Sample Hazy – Yes.”
Precision and Bias
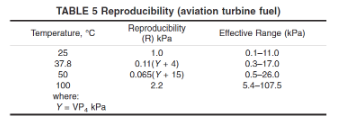
The precision for this test method was developed in 2003 in a interlaboratory study that included gasoline and gasoline-oxygenate blends, totaling 20 sets randomly distributed among 12 participating laboratories and two types of instruments. Precision for aviation turbine fuels was developed in 2007 involving 2 types of instruments, 11 samples and 11 participant laboratories. Consult research reports RR: D02-1609 and RR: D02-1651 for details and supporting data. Both interlaboratory test programs were conducted in accordance with D6300 Standard Practice.
Repeatability and Reproducibility are summarized in the tables 2 – 5 below:
Experimental parameters such as sample types and sampling devices; flows and temperatures should be used in accordance with the manufacturer’s operation manual. The same applies to experimental methods and procedures to keep the system in optimum stability conditions and free of leaks, obstructions and contamination. All calibration steps, formulas and calculation as per D6378 are considered and carefully included in the available methods of the Eravap versions shown below.


