ASTM D6667
Standard Test Method for Determination of Total Volatile Sulfur in Gaseous Hydrocarbons and Liquefied Petroleum Gases by Ultraviolet Fluorescence
GM7000-TS7000 system provides the required stability and sensitivity for the reliable determination of total sulfur content in LPG and Natural Gas in accordance with D6667. The totally software controlled box purges the system and injects consistently representative amount of sample. LPG samples are directed to an expansion vessel for homogenization prior to being swept into the pyrotube inlet zone for a complete combustion of the sample. All bound sulfur compounds are converted into sulfur dioxide. The method benefits from the advantage that SO2 absorbs the UV light fast and quantitatively forming excited SO2* species that readily relax to its ground state releasing its excess energy. The released energy is proportional to the total S concentration and is captured by a PMT which is set at the violet/blue region of the spectrum. The envelop of energies released by the relaxation of SO2* lies in the 340 – 420 nm region. It was found that the sensitivity greatly increases by optically selecting the excitation energy envelope narrow enough to minimize interferences from other species that might fluoresce in the same region. At these excitation wavelengths around 220 nm the reaction ratio towards nitrogen is minimal so in the case of high nitrogen concentration samples the bias can be significantly reduced to less than 1%. Sulfur is ubiquitous in traces levels in LPG, Refinery Gas and Natural Gas. Its determination is important because It contributes to the total S specifications of gasoline products. “TSHR TS7000 analyzer guarantees precise, and accurate experimental results. The system meets with great ease the required LOQ of the method scope and the linear response of the technique”. (Aaron Mendez Ph.D.)
Method Summary:
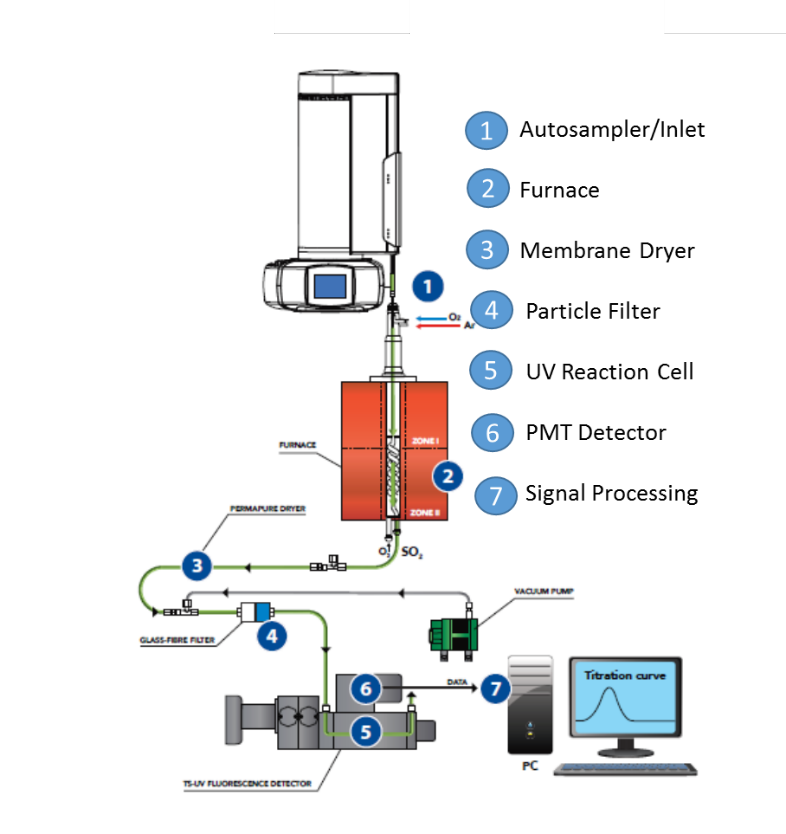
A measured quantity of a LPG sample is introduced into an expansion vessel kept at a suitable temperature to volatilize the sample. A carrier gas stream, at a controlled rate incorporates it into a high temperature furnace (900 to 1150 °C) were an excess of pure oxygen is added. Pyrolysis converts hydrocarbons in the specimen to CO2 and H2O. Volatile Organic Sulfur compounds present in the sample are converted into sulfur dioxide (SO2). After the gases exit the combustion zone they are passed through a semipermeable Nafion® membrane dryer where the water is quantitatively removed. The gases pass then to a reaction cell where they are excited by a UV light. The dry gases containing the excited SO2* species fluoresce upon relaxation releasing an amount of energy proportional to the S original concentration. The relaxation takes a few nanoseconds and the energy captured by a Photo Multiplier Tube, is filtered, amplified and recorded. The signal obtained is compared to a previously prepared calibration curve for the final quantification of the unknown sample.
Apparatus
The vertical configuration analyzer for the analysis of liquid volatile organic compounds is represented in fig.1. The system is provided with a liquid automatic sample changer and an automatic totally software controlled LPG/Gas box. After vaporization, the carrier gas will sweep the sample to the non-oxidative vaporization inlet system 1; a dual zone combustion furnace 2 that holds the pyrotube; the membrane dryer 3; a precautionary particle filter 4; the reaction cell 5; the detector module 6; and the signal acquisition and processing unit 7. The pyrotube configuration in the furnace hottest zone has a spiral inner tube that meets a countercurrent secondary stream of oxygen to allow for extra residence time and extra oxygen to provide complete combustion conditions necessary to achieve the stability to hold for long periods the calibration and to maximize the signal to noise ratio needed for a low LOQ.
Test Procedure:
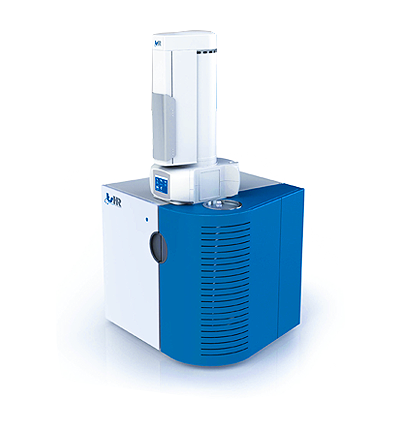
Apparatus preparation and calibration: Once the system has been assembled, leak tested, heated and stabilized per the instrument manufacturer instructions, the optimum operating conditions are stablished and adjusted as per the manufacturer’s guidelines. Two important characteristics of this technique are: equimolarity and linear response. The first means that any organic compound containing at least one bound atom of S produces the same intensity response therefore can serve as a calibration compound, and the second means that the calibration can proceed with a minimum of three points which will increase the speed of the calibration process. Based on anticipated sulfur concentrations needs, the instrument is then calibrated using a certified LPG standard cylinder from commercial standard reference laboratories. GM7000 allows for the calibration sampling of up to 100 loops of 100 µL each. The total calibration range can be programmed utilizing only one single calibration cylinder. The calibration method is set to average three consecutive injections for each calibration point. Check the linear regression coefficient of the obtained calibration curve and make the necessary corrections should the linearity not be in accordance with ASTM D6667 and the manufacturer’s instructions, typical values of R2 ≥ 0.995 are acceptable. It is a good laboratory practice to check the capillary visor and tubing lines for bubbles and to start the calibration in ascending order to reduce risk of carryover that could affect the linearity of the calibration. Should the linear regression coefficient fall below the required linearity, the instrument status, the injections and calibration standards should be checked. Replace as necessary and rerun the calibration. Some instrument like the one displayed in Fig.1 have a software with an automatic clean and purge function that allows the use of a single calibration material for the entire calibration range eliminating risks of carryovers and cross-contamination errors in the process. Analysis: Prepare a sequence of analysis for the samples to be analyzed under the same unaltered experimental conditions and again take the average of three consecutive injections. Sulfur concentrations of the unknown samples should fall within the calibration range. Add calibration points on gravimetric or volumetric basis if necessary. Measure the response of the system for the test solution and inspect the combustion tube and the flow tubing of the instrument after the sample analysis to verify complete combustion. Soot should not be detected. In case the soot formation is detected care should be taking by reducing sample size, temperatures and flows. After thoroughly cleaning the systems as per manufacturer’s instructions recalibrate if instrumental parameters change and reanalyze samples. Densities needed for the calculations are to be measured by ASTM Test Method D1070 at the test temperature.
Report
Report the experimental results as mg S/kg of the sample. Report to the nearest 0.1 mg/kg for concentrations below 10 mg/kg and to the nearest mg/kg for concentrations above 10 mg/kg.
Precision and Bias
The precision for ASTM D6667 was obtained from an ILS with samples based on n-butane, i-butane and propane/propylene mix. A Research Report D02-1506 contains the data that derived the current precision statement. Repeatability—The difference between two test results obtained by the same operator with the same apparatus under constant operating conditions on identical test material would, in the long run, in the normal and correct operation of the test method, provide the following repeatability value: r = 0.1152(X) X_ average of 2 test results Reproducibility—Taken as the difference between two single and independent test results obtained by different operators working in different laboratories on identical test material would, in the long run, in the normal and correct operation of the test method, exceed the following values in only one case in twenty: R = 0.3130(X) X _ average of 2 test results Bias— The same Research Report reported no significant bias on commercial certified gravimetric standard reference materials. All results fell within the repeatability of ASTM D6667.
Quality Assurance and Quality Control
Experimental values and QC/QA control samples should fall within the precision estimates of the method or comply with the general equations for “r” and “R” as described above. It is recommended to follow Guide D 6299 to help ensure the quality of data generated by this test method.


