ASTM D6897-16
Standard Test Method for Vapor Pressure of Liquified Petroleum Gases (Expansion Method)
This test method covers the use of automatic vapor pressure instruments to determine the vapor pressure of liquefied petroleum gas products at a temperature of 37.8°C, vapor to liquid ratio of 0.5:1, and pressures from 200 to 1550 kPa on a sample volume of 3.33 mL.
This test method is applicable to the determination of vapor pressures of liquefied petroleum gas products at temperatures from 37.8 to 70°C, vapor to liquid ratios of 0.1:1 to 4:1, and pressures up to 3500 kPa; however, the precision of the test method has only been determined for a V/L ratio of 0.5:1, at a temperature of 37.8°C, and a pressure range from 300 to 1500 kPa.
NOTE 1—This test method is not intended to determine the true vapor pressure of LPG samples, but rather determine and report the vapor pressure of LPG at the 37.8°C temperature and 0.5:1 V/L ratio as indicated in the Test Method D1267.
NOTE 2—This test method is not a true vapor pressure method and will not measure the full contribution from any dissolved gases such as nitrogen or helium if they are present. The contribution of light gases to the measured vapor pressure is highly dependent on the test temperature, type of gas, and V/L ratio of the test.
The values in SI units are to be regarded as standard. No other units of measurement are included in the standard.
D6897 determines the vapor pressure of LPG at 37.8 0C at a V/L of 0.5 to 1, pressure between 200 and 1550 kPa utilizing a volume of 3.33 mL of sample. Vapor pressure measurements in LPG is important for safety measures during handling, transportation and storage.
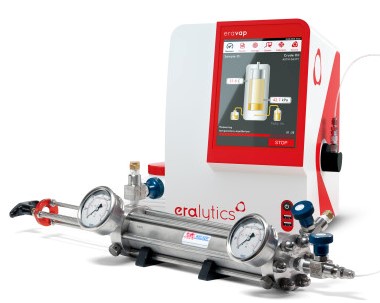
EravapLPG provides the required sensitivity and stability for the reliable determination of the vapor pressure of LPG according to the method scope and perfectly correlates to the manual Gage Vapor Pressure method D1267. The system meets with great ease the required precision of the method scope is fully automated, therefore is not operator biased; results are given in 5 minutes; does not require special skills from the operator and full training takes just a couple of minutes.
EravapLPG analyzer, provides easy and safe operation and guarantees precise, and accurate experimental results
Referenced Documents
ASTM Standards:
D1265 Practice for Sampling Liquefied Petroleum (LP) Gases, Manual Method
D1267 Test Method for Gage Vapor Pressure of Liquefied Petroleum (LP) Gases (LP-Gas Method)
D2892 Test Method for Distillation of Crude Petroleum (15-Theoretical Plate Column)
D3700 Practice for Obtaining LPG Samples Using a Floating Piston Cylinder
D5191 Test Method for Vapor Pressure of Petroleum Products (Mini Method)
D6299 Practice for Applying Statistical Quality Assurance and Control Charting Techniques to Evaluate Analytical Measurement System Performance
Energy Institute Standards:
IP 181 Sampling Petroleum Gases
Terminology
Definitions:
Definitions:
liquefied petroleum gases (LPG), n—narrow boiling range hydrocarbon mixtures, consisting mainly of propane or propylene, or both (Warning—Extremely flammable. Harmful if inhaled), butanes and butylenes, or both; in which the concentration of hydrocarbon compounds with boiling point greater than 0°C is less than 5 % by liquid volume, and whose vapor pressure at 37.8°C (100°F) is not greater than 1550 kPa.
platinum resistance thermometer, n—temperature measuring device with platinum wire, whose electrical resistance changes in relation to temperature.
vapor-liquid ratio (V/L), n—of a liquid, the ratio of the vapor volume to the liquid volume of specimen, in equilibrium, under specified conditions.
Definitions of Terms Specific to This Standard:
total vapor pressure (Ptot), n—the absolute vapor pressure (relative to vacuum) exerted by the specimen at the specified temperature and vapor-liquid ratio.
true vapor pressure, n—the physical property of a given liquid which specifies the maximum pressure at which a vapor phase can coexist with the liquid phase at a given equilibrium temperature condition.
vapor pressure of LPG, n—the total pressure corrected relative to normal barometric pressure.
Abbreviations:
LPG—liquefied petroleum gas
V/L—vapor liquid ratio
Summary of Test Method
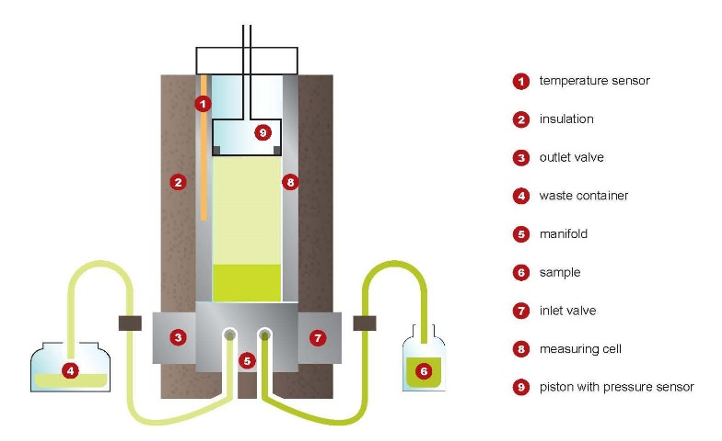
Employing a measuring chamber with a built-in piston, the chamber is rinsed three times with a portion of sample, which is then discarded. A sample of defined volume is drawn from a pressurized sampling system into the temperature-controlled chamber at 5°C by moving the piston to the filling position. After sealing the chamber, the volume is expanded by moving the piston until the final volume produces the desired V/L ratio of 0.5:1. The temperature of the measuring chamber is then regulated to the test temperature of interest, such as 37.8°C.
The observed total pressure at equilibrium is corrected relative to 101.3 kPa and reported as the LPG vapor pressure at the selected test temperature.
Significance and Use
Information on the vapor pressures of liquefied petroleum gas is pertinent to selection of properly designed storage vessels, shipping containers, and customer utilization equipment to ensure safe handling of these products.
Determination of the vapor pressure of liquefied petroleum gas is important for safety reasons to ensure that the maximum operating design pressures of storage, handling, and fuel systems will not be exceeded under normal operating temperature conditions.
For liquefied petroleum gases, vapor pressure can be considered a semi-quantitative measure of the amount of the most volatile material present in the product.
This test method uses a small sample volume and excludes any manual handling of a measuring chamber under high pressure.
Apparatus
Vapor Pressure Apparatus—The type of apparatus suitable for this test method employs a small volume, cylindrically shaped measuring chamber with associated equipment to control the chamber temperature within the range of 5 to 70°C. The measuring chamber shall contain a movable piston with a maximum dead volume of less than 1 % of the total volume at the lowest position to allow sample introduction into the measuring chamber and expansion to the desired V/L ratio. A static absolute pressure transducer shall be incorporated in the piston. The measuring chamber shall contain an inlet/outlet valve combination for sample introduction and expulsion. The piston and the valve combination shall be at the same temperature as the measuring chamber to avoid any condensation or excessive evaporation.
The test chamber shall be designed to contain a total of 5 mL of liquid and vapor and maintain a V/L ratio of 0.5:1 with a maximum deviation of 0.02.
NOTE 3—The test chamber employed by the instruments used in generating the precision and bias statements were constructed of nickel-plated aluminum and stainless steel.
NOTE 4—Test chambers exceeding a 5 mL capacity can be used, but the precision and bias statements are not known to apply.
Electronic temperature control shall be used to maintain the measuring chamber at the prescribed temperature within 60.1°C for the duration of the vapor pressure measurement.
The pressure transducer shall have a range of 0 to 3500 kPa with a minimum resolution of 1 kPa. The minimum accuracy shall be 61 kPa for pressures up to 700 kPa, 62 kPa for pressures up to 1750 kPa, and 64 kPa for pressures up to 3500 kPa.
A platinum resistance thermometer, or equivalent, shall be used for measuring the temperature of the test chamber. The minimum temperature range of the measuring device shall be from 0 to 80°C with a resolution of 0.1°C and a minimum accuracy of 60.1°C.
Vacuum Pump for Calibration, capable of reducing the pressure in the measuring chamber to less than 0.01 kPa absolute.
McLeod Vacuum Gage or Calibrated Electronic Vacuum
Measuring Device for Calibration, to cover at least the range from 0.01 to 0.67 kPa (0.1 to 5 mm Hg). The calibration of the electronic vacuum measuring device shall be regularly verified in accordance with A6.3 of Test Method D2892.
Pressure Measuring Device for Calibration, capable of measuring local station pressure with an accuracy and a resolution of 0.1 kPa (1 mm Hg) or better, at the same elevation relative to sea level as the apparatus in the laboratory.
NOTE 5—This test method does not give full details of instruments suitable for carrying out this test. Details on the installation, operation, and maintenance of each instrument may be found in the manufacturer’s manual.
Test Procedure
Connect the pressurized sample container to the inlet of the apparatus and position it in such a way that the outlet valve of the container is below the liquid level. Open the outlet valve of the pressurized sample container.
Rinsing—Open the inlet valve and draw in the sample by moving the piston from zero-volume to the filling position.
Close the inlet valve and open the outlet valve, move the piston to zero-volume position. Close the outlet valve. Repeat this procedure two more times.
Filling—Regulate the measuring chamber to the filling temperature of 5 6 0.5°C. When the measuring chamber is at the filling temperature, close the outlet valve and open the inlet valve. Draw in the sample from the pressurized sample container by moving the piston from zero-volume to the filling position. Close the inlet valve.
Expansion—Move the piston to the final volume to provide the necessary V/L ratio (the overall volume of the measuring chamber is 1.5 times the fill volume of liquid for a V/L ratio of 0.5:1).
Total Pressure Determination—Adjust the temperature regulator of the measuring chamber to the test temperature of interest, such as 37.8°C. After the temperature equilibrium observe the pressure reading. If two consecutive readings remain constant within 63 kPa after 1 min, record the observed pressure as total pressure of the sample at test temperature.
Report
Report the corrected total pressure as the LP-Gas vapor pressure test result and specify the test temperature and V/L ratio if not equal to 0.5:1.
VP(Tm °C) = #### kPa
where:
Tm = measuring temperature.
Quality Assurance and Quality Control
After preparing and calibrating the apparatus according to manufacturer’s instructions and having verified that the instrument is performing properly, use a representative quality control (QC) sample to confirm that the instrument’s performance is in statistical control.
Use a verification fluid or gas of known vapor pressure as an independent check against the instrument calibration each day the instrument is in use. For pure compounds, multiple test specimens may be taken from the same container over time.
A possible pure gas for verification of the instrument and its corresponding vapor pressure at 37.8°C and a V/L ratio of 0.5:1 is:
Propane VPtot (37.8°C) = 1301 kPa
If the observed total pressure differs from the reference value by more than 7.0 kPa, check the instrument calibration.
A second possible pure gas for verification of the instrument and its corresponding vapor pressure at 37.8 °C and a V/L ratio of 0.5:1 is:
Butane VPtot (37.8°C) = 356.5 kPa
If the observed total pressure differs from the reference value by more than 6.0 kPa, then check the instrument calibration.
If a liquid is used to check the performance of the test, cool and air saturate the liquid according to the corresponding sections in the sample preparation procedure of Test Method D5191.
A possible liquid for verification of the instrument and its corresponding vapor pressure at 70°C and a V/L ratio of 0.5:1 is:
Pentane VPtot (70°C) = 310 kPa
If the observed total pressure differs from the reference value by more than 6.0 kPa, check the instrument calibration. (Warning—The values given for the vapor pressures of propane, butane, and pentane are the total pressure values. If the instrument reading corresponds to the automatically corrected LPG vapor pressure relative to atmospheric pressure, add 101.3 kPa to the value displayed by the instrument before comparing to the above values for pure compounds.) (Warning—The use of single component verification materials such as those listed above will only prove the calibration of the equipment. It will not check the accuracy of the entire test method, including sample handling, because losses due to evaporation will not decrease the sample vapor pressure for single component materials as happens with losses of light ends in multi-component mixtures.)
NOTE 8—The value for pentane was derived from the 1999 interlaboratory cooperative test program and represents the total pressure value of the air saturated liquid at the specified temperature.
NOTE 9—It is recommended that at least one type of verification fluid or gas used have a vapor pressure representative of the samples regularly tested by the equipment. The vapor pressure measurement process (including operator technique) can be checked periodically by performing this test method on previously prepared samples from one batch of product, in accordance with the procedure described in Section 12. Samples should be stored in an environment suitable for long term storage without significant sample degradation. Analysis of result(s) from these quality control samples can be carried out using control chart techniques, such as those outlined in Practice D6299.
Experimental values and QC/QA control samples should fall within the precision estimates of the method or comply with the general equations for “r” and “R” as described below. It is recommended to follow Guide D 6809 to help ensure the quality of data generated by this test method.
Precision and Bias
Precision—The precision of this test method as determined by the statistical examination of interlaboratory test results is as follows:
Repeatability—The difference between successive test results obtained by the same apparatus under constant operating conditions on identical test material would, in the long run, in the normal and correct operation of the test method, exceed the following value only in one case in twenty:
Repeatability = 7.4 kPa (1.1 psi)
NOTE 10—The repeatability was calculated from triplicate determinations on 20 samples of propane measured under single site repeatability over the range of 300 to 1463 kPa (44 to 212 psig) using a V/L ratio of 0.5:1, at a temperature of 37.8°C. No trend in variance was detected over this range.
Reproducibility—Reproducibility has not been determined due to extreme difficulty with distribution of these sample types for an interlaboratory study.
Relative Bias to Test Method D1267—Relative bias has not been determined.
Bias—Since there is no accepted reference material suitable for determining the bias for the procedure in this test method, bias has not been determined.
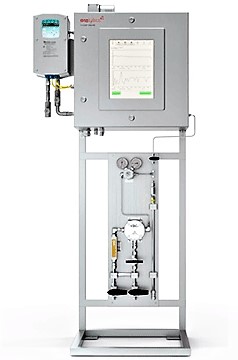
Experimental parameters such as sample types and sampling devices; flows and temperatures should be used in accordance with the manufacturer’s operation manual. The same applies to experimental methods and procedures to keep the system in optimum stability conditions and free of leaks, obstructions and contamination. All calibration steps, formulas and calculation required by D6897 are considered and carefully included in the available methods of the EravapLPG versions shown below.


